Installing Guardi quartz panels is something you can do yourself, in four stages: preparing the substrate, the tinted primer (which acts as the grout), gluing with a 4 mm notched trowel, and an optional UV varnish. The adhesive goes on at least 24 hours after priming, at +5 to +25°C. Below I walk through each step with the times, temperatures and coverage taken from the manufacturer's technical data sheets.
Quartz panels are ready-made sheets of quartz compound, fixed to the wall with adhesive - with no separate grouting compound, because the grout here is formed by the tinted primer. A well-prepared installation decides the result: even joints, a uniform colour and durability for years. This guide takes you through the whole process step by step.
Śledź nas w social media
Inspiracje, porady i nowości ze świata tynków i dekoracji
There is an FAQ at the end - the shortest answers on drying times, temperature and tools.
1. What you need - tools and materials
The Guardi system is the panels plus three materials: a tinted primer, a gel adhesive and an optional UV varnish. Below is the coverage straight from the technical data sheets - useful for working out quantities.
← swipe the table →
Material
Coverage
Note
Tinted primer
0.3 kg/m²
colour = grout colour
Adhesive for cladding
0.5-0.8 kg/m²
4 mm notched trowel
UV facade varnish
8-10 m²/l per coat
applied in 2 coats
Quartz panels (45 × 90 cm)
approx. 2.5 pcs/m²
buy the whole area at once
Tools: 4 mm notched trowel (adhesive), pressure roller, brush or roller (primer and varnish), paintbrush and sponge (removing excess adhesive), cloth or paper towels, knife with spare blades (cutting panels).
Materials for installation - available in the shop
The substrate must be strong, even, clean, dry, dust-free and load-bearing, free of grease and biological growth. Season new cement renders for 3-4 weeks before gluing. Reinforce absorbent or dusty substrates with FIXGRUNT U primer, and remove any mould mechanically and disinfect with BIOTOX TOTAL. Fill in defects and unevenness and let the repair mortar dry - the look of the joints depends on how even the substrate is.
Step 2: priming (this is your grout)
Apply the tinted primer with a brush, broom, roller or by spraying. Choose it in a colour close to the panels - the primer creates the visible grout colour while also improving adhesion and evening out the substrate's absorbency. Work at +5 to +30°C. Coverage is about 0.3 kg/m², drying time 12-24 hours. In an external insulation system, the reinforced layer is primed at least 3 days after it is made.
Step 3: gluing the panels
Apply the adhesive at least 24 hours after priming. First plan the panel layout on the wall (you can lay them with a joint or butted together) - this limits waste and lets you set out the cuts neatly. Spread the adhesive evenly with a 4 mm notched trowel, working in sections - so that you press the panels into fresh adhesive before a "skin" forms. If the adhesive dries out, remove it and apply a fresh layer.
Press each panel firmly (with a pressure roller or a float) until the adhesive covers its entire back and slightly squeezes out past the edge. Remove the excess immediately and wipe off any smears with clean water and a sponge - do not leave ridges of adhesive in the joint. Work at +5 to +25°C, at humidity below 80% and out of direct sun. The adhesive's open time is about 15 minutes, and full set takes at least 24 hours.
Step 4: varnishing (optional)
UV facade varnish is applied once the adhesive is fully dry. It protects against soiling, fading and mould - worth using on facades exposed to moisture, dirt and strong sun. Apply two coats with a roller (panels) and a brush (joints); the second coat after at least 4 hours, at +10 to +25°C. The surface will withstand brief contact with water after 24 hours, and the varnish reaches its full protective properties after 28 days.
How much varnish: coverage is 8-10 m²/l per single coat. The 2.5 l pack from the ready-made kit covers one coat over 24 m² - for full two coats, add proportionally more.
6. Video: installation step by step
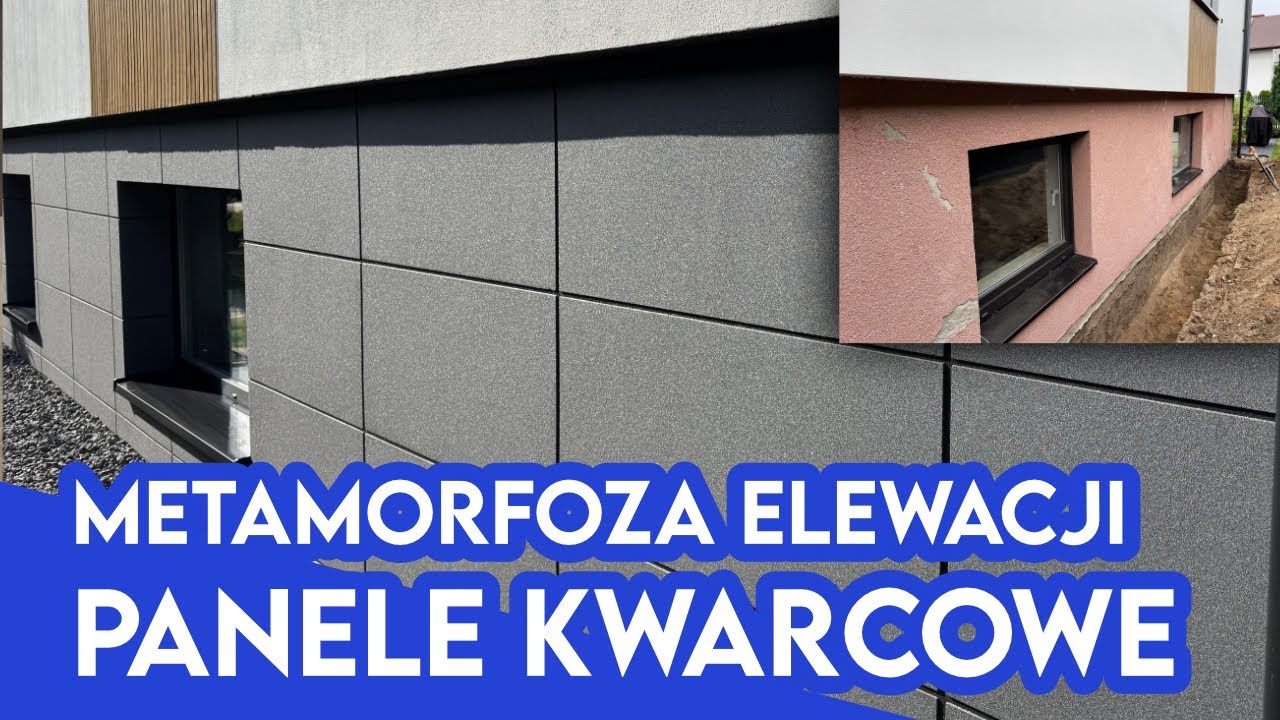
See the installation in practice - on the KONKOL channel an influencer shows the transformation of an old, run-down facade using quartz panels.
Transforming an old facade with quartz panels | video: KONKOL channel
In the film, an influencer on the KONKOL channel shows the transformation of an old, damaged house render using quartz panels - from preparing the wall, through gluing the panels, to the finished facade. The material is in Polish and clearly illustrates the sequence of work described above. Running time: 10:24.
Subscribe to our newsletter!
Get the latest news and offers straight to your inbox. Subscribe now.
7. Common mistakes
Laying panels straight from one pack in order - natural aggregates give slight shade differences between batches. Mix panels from several packs and buy the whole area at once, otherwise side light will reveal "stripes" on the wall.
Working on dried-out adhesive - a panel pressed into a layer with a "skin" holds poorly. Apply the adhesive in sections.
Ridges and smears of adhesive in the joint and working in poor conditions (sun, humidity above 80%) - can cause milky stains and shade differences. Remove excess as you go.
Adhesive applied too early - before 24 hours have passed since priming, or onto unseasoned/new renders (season 3-4 weeks).
Skipping the primer colour choice - the primer is the grout, so the wrong primer colour spoils the whole effect.
8. Ready-made kit and quote
If you would rather not source the materials separately, a ready-made kit for 24 m² is available in our shop, in matched proportions (panels, tinted primer, adhesive, optional varnish). For full quotes across different areas see quartz panel price: 7 practical valuations, and for technical data and applications see the complete guide.
Measure your area in 30 seconds: measure the height and width of each wall, multiply, add them up and subtract windows and doors. Send us the result in m² and we will work out the quantity of material and price the whole system for your project, usually within one business day.
Zapytaj o wycenę
Najpierw wskaż, co wyceniamy
W wiadomości podaj nazwę produktu (np. Klondike, Rococo 1000) albo opisz efekt dekoracyjny, który Cię interesuje. Dzięki temu policzymy właściwy system materiałów.
Wycenimy koszt materiałów oraz - jeśli potrzebujesz - szacunkowy koszt robocizny fachowca w Twoim regionie. Odpowiadamy zazwyczaj w ciągu jednego dnia roboczego.
Co warto podać w wiadomości:
nazwę produktu lub efekt dekoracyjny, który chcesz uzyskać
metraż powierzchni do pokrycia (ściany i podłogi osobno)
Przycisk otwiera Twoją aplikację pocztową. Jeśli wolisz - skopiuj adres powyżej i napisz bezpośrednio.
Written for you by: Jakub MarciniakDecorative renders and paints specialist at mybudio.eu, certified applicator. I describe the installation based on the manufacturer's technical data sheets and my own practice - if you have questions, we will help you choose the material and technique for your project.
FAQ - installing quartz panels
Can quartz panels be installed yourself?
Yes. All you need is an even substrate and basic tools (4 mm notched trowel, pressure roller, brush, sponge, knife). The most important things are good substrate preparation, matching the primer colour to the grout, and working in sections before the adhesive starts to set.
At what temperature should quartz panels be installed?
Priming +5 to +30°C, gluing +5 to +25°C (humidity below 80%, out of the sun), varnishing +10 to +25°C. These are substrate and ambient temperatures - figures from the manufacturer's technical data sheets.
How long do the primer and adhesive take to dry?
The primer dries in 12-24 hours, and the adhesive goes on at least 24 hours after priming. The adhesive has an open time of about 15 minutes and dries in at least 24 hours. The varnish dries in about 6 hours (second coat after at least 4 hours), full properties after 28 days.
Do quartz panels need grout?
You do not buy separate grout - its role is played by the tinted primer, which is why it is chosen in a colour close to the panels. Panels can be laid with a joint or butted together.
Is the UV varnish necessary?
No, it is optional - mainly for facades exposed to moisture, dirt and sun. It is applied in two coats; a 2.5 l pack covers one coat over 24 m².